Is your website running slower than a puppy pulling a freight train? For first steps to remedy the situation, check out our blog post on Diagnosing a Slow WordPress Site. If your site is still running slow, it might be time to consider migrating your website to a new hosting provider.
[0] => Survey Your Requirements

When migrating your WordPress website and choosing your next host, some things worth considering are:
- How many users you have or expect to have
- What level of support you require via email, live chat, or phone
- Where you are hosting your email
Traffic
Be cautious with budget hosts (typically, $8 per month) that advertise UNLIMITED bandwidth or traffic. While cheap vendors might be sufficient for small blogs, often several thousands of websites are being hosted on the same server, fighting over the same system resources, which can result in slower speeds for more complex websites.
If your website is critical to your business success, it’s best to go with a company that allocates service by visitor count and typically starts with pricing around $29 per month. Often, when choosing a host based on metered traffic, your website is hosted on faster servers with a minimum guarantee of system resources.
Support
While a 99.99% uptime guarantee is typical of most modern-day hosts, in reality, things go wrong that can’t be expected. When choosing a vendor, always look for what ways you can reach out to support. While paying more for your hosting may not be fun, having phone or live chat support in the middle of a crisis can save you countless hours, rather than waiting for a reply by email.
While this does not directly impact the performance of your website, often when purchasing hosting from budget hosting providers like GoDaddy or Host Gator, you also receive email hosting as part of your hosting price. When migrating to a specialized WordPress host, often they do not provide email services at all. In that case, consider budgeting $6 per month per email address for hosting your email with Google App for business.
[1] => Backup, Backup, Backup

Now that you know where you are migrating your WordPress website to, it is time to make a backup of your website. Depending on your size and budget, there are a lot of great choices on the market with some detailed below, in no particular order. When backing up your website, it is vitally important that you back up not only your website files but also a copy of your database.
Backup Solutions
- ManageWP is an affordable tool to backup and manage multiple websites at once. You can request backups manually or set up a timed interval to backup monthly, weekly, daily, or hourly.
- UpdraftPlus offers a robust free option as well as options to backup on a timed interval. One major plus to this plugin is the ability to backup to Google Drive, Dropbox, and Amazon S3.
- BackupBuddy offers the ability to backup your entire website to remote locations on a timed interval, just like the previously mentioned options. However, one thing that is unique to this plugin is its ability to restore and optimize your database.
[2] => Set Up Your New Host

At this point, you should have a list of host requirements and your website backed up. Now, it’s time to buy your new hosting service. When selecting your host, it’s worth checking to see if they offer migration services during checkout. Often, migrating a WordPress website is included free with annual plans or made available for a one-time setup fee.
Having your host migrate your website might be a good option to consider if you are not comfortable with the technical aspects of setting up your new hosting environment. If you are still undecided on who to choose for hosting, consider using our WordPress maintenance, support, and hosting company, Maintainn. Maintainn’s hosting includes migrating your WordPress website, along with top-notch support, blazing fast hosting, and affordable pricing.
Note: If your new host is providing your migration services, feel free to skip to step 05 Setup Backups.
[3] => Upload Your Backup

Note: For demonstration purposes, we will be showing how to set up your hosting in a DreamHost shared account; however, your chosen host’s interface may be different. If you have any questions on any steps, reaching out to your host’s QA and support will be your best first step.
Set Up Your Domain
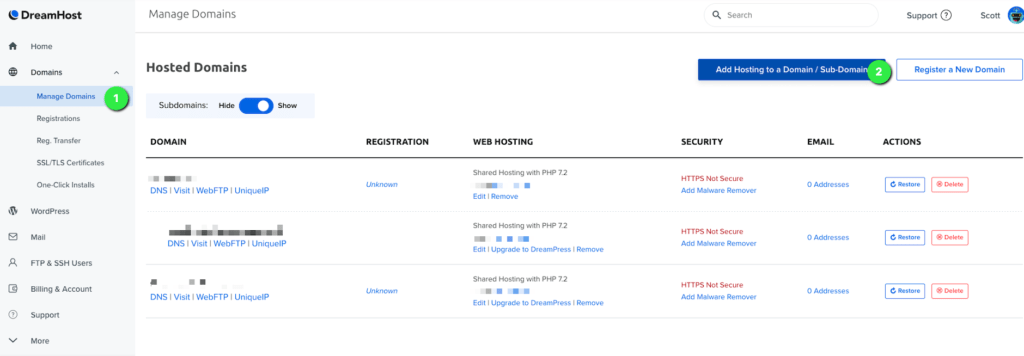
In order to upload our website backup, we must first create a domain record for it. Under manage domains, click Add Hosting to a Domain / Sub-Domain.
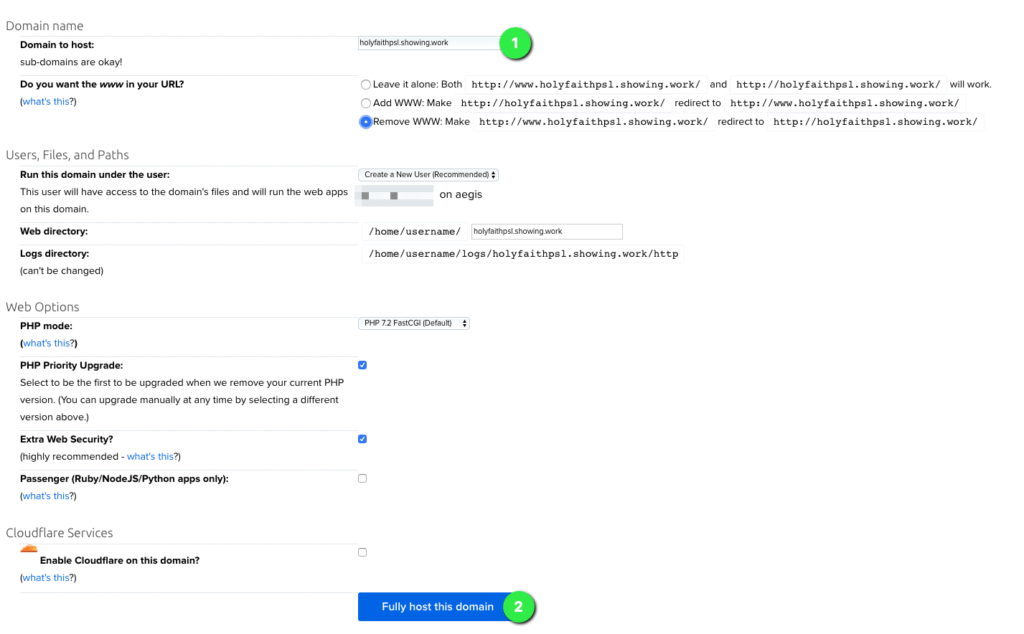
Next, enter your site’s domain. In our case, the website’s URL is holyfaithpsl.showing.work. You can choose to have “www” added to your website, but for our example, we won’t. After you are happy with your domain settings, scroll to the bottom of the page and click the Fully host this domain button.
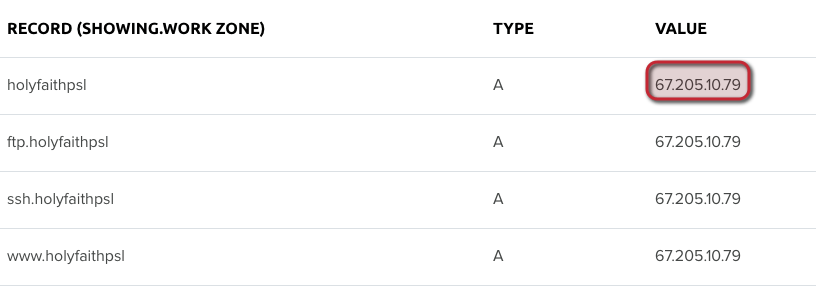
Next, since we are not going to have Dreamhost manage our DNS, we need to get the IP address for the server on which our site is now provisioned. Back under the Manage Domains page of your account, click on DNS under the domain name we just created. Scroll to the bottom of the page and record the IP address for the A record next to the domain name; in our case, we were assigned 67.205.10.79. Record this for later.

Import Database
Now it’s time to create a database for our site. Click on MySQL Database under the More header and use the following steps to define your new database. Ensure you record the database name, user, and password you defined for later.
- Enter desired database name.
- Select Create a new hostname now…
- Select your domain and use mysql as the subdomain.
- Under user, select Create a new user now…
- Enter desired username.
- Enter desired password.
- Confirm password.
- Finally, click Add new database now!
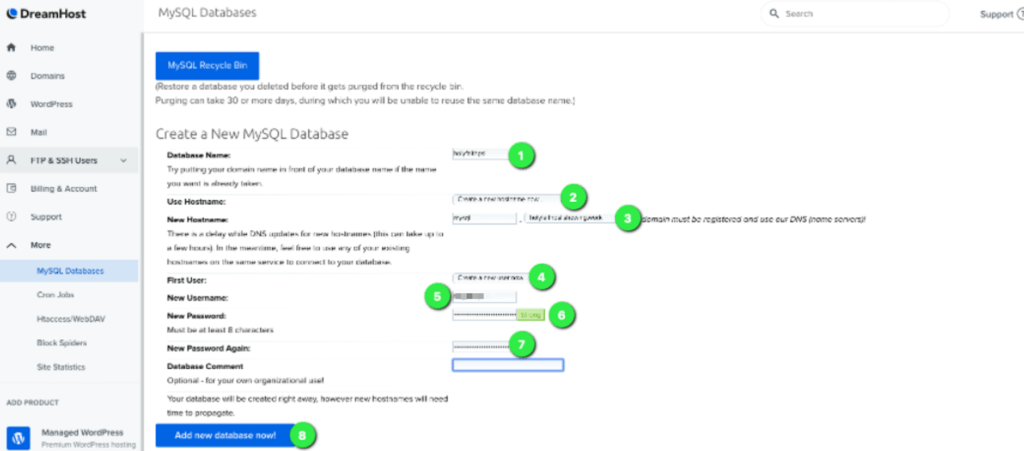
With our database created on the MySQL Databases page, click on phpMyAdmin next to the database we just created above.

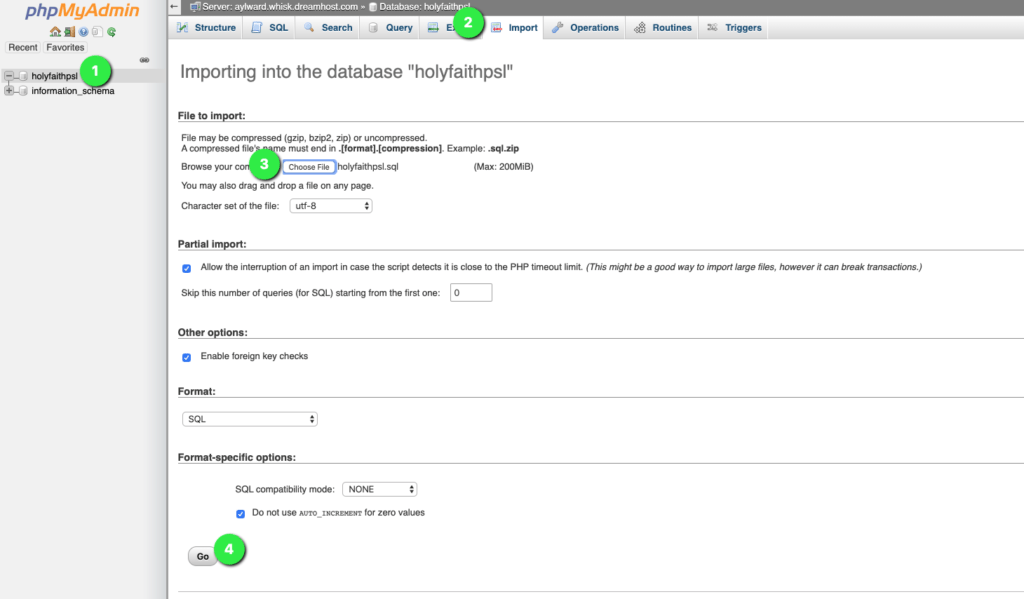
Once you log in to phpMyAdmin, click on Import. In the importer upload the .sql file exported from your backup and click Go. That’s it for our database!

Upload Files
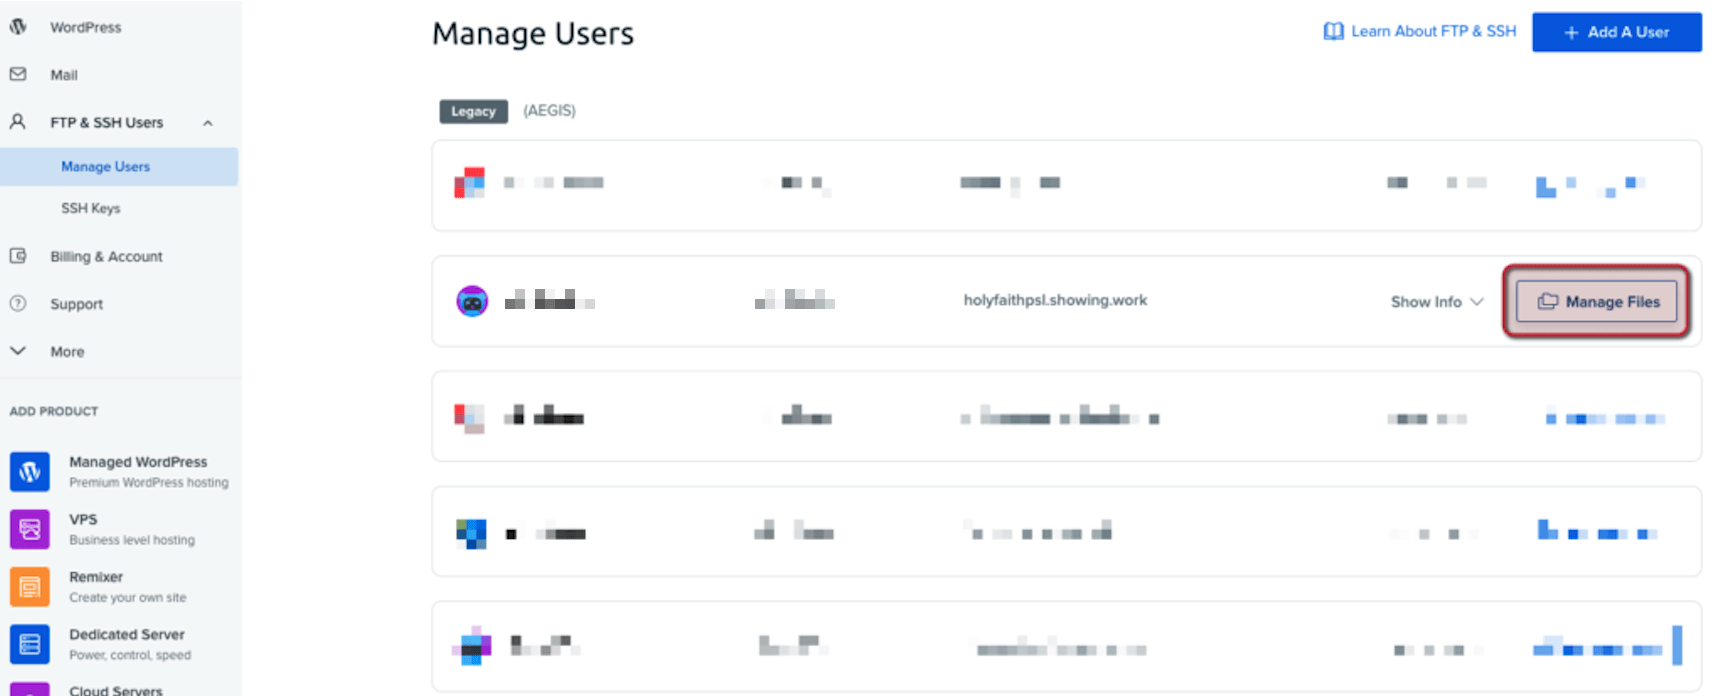
Now it’s time to upload the site files themselves. Under FTP & SSH Users > Manage Users, find the domain you registered and click Manage Files.
Now that you are in the WebFTP view, simply upload your website backup files (not your database).

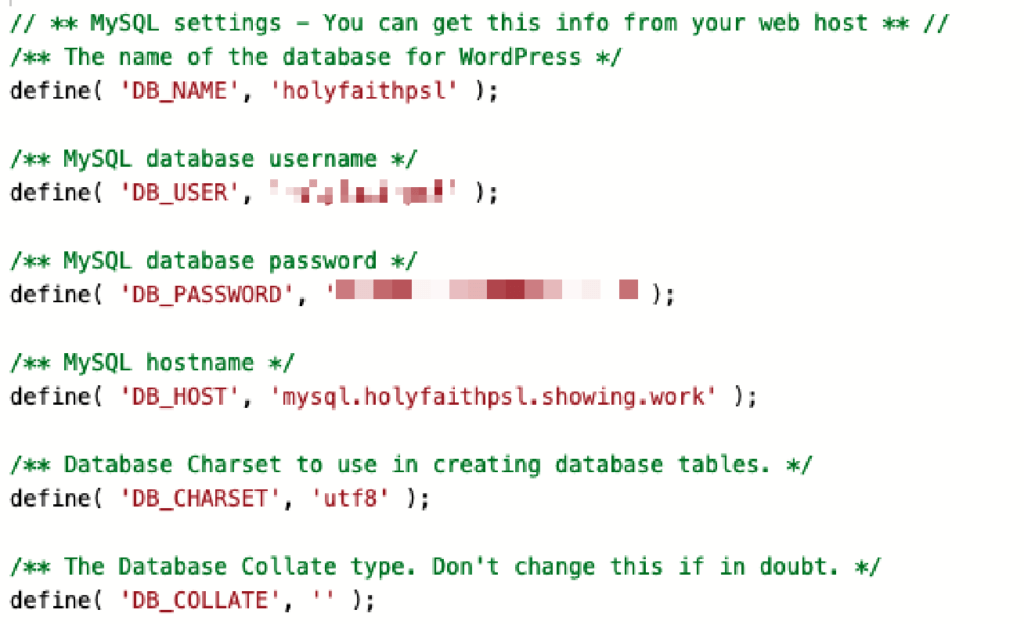
Lastly, it’s time to update our wp-config.php with the database we created earlier. Right click on wp-config.php and click Edit. With the wp-config.php open, scroll down to your ‘DB_NAME’, ‘DB_USER’, ‘DB_PASSWORD’, and ‘DB_HOST” section and update with the information we recorded earlier.
Note: Most hosts require the DB_HOST be set to localhost; Dream Host, however, requires this be the specific subdomain we made earlier.
[4] => Update Your DNS
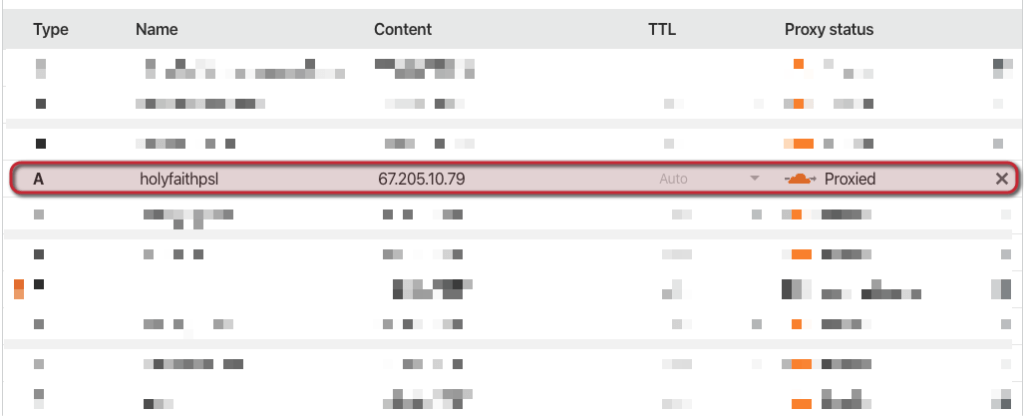
The last step to bringing our website online is updating our domain to point to our new hosting provider. From the IP address we recorded earlier, log into your domain DNS control panel and create an A record to point to the IP address we recorded in the step before.
Congratulations! Your website is now migrated to your new hosting server.
[5] => Set Up Backups
Although your hosting provider may provide incremental backups for your website, it is always recommended to set up at least one other third-party backup solution for your website. In the event your host experiences any downtimes or data loss, you can never have too many backups. One of the easiest ways is to use ManageWP, which will back up your website to their third-party servers starting at only $2 per month.
The post 5 Steps to Migrating Your WordPress Site appeared first on WebDevStudios.


