June 22, 2017
Within AdWords, there is a tool called Bid Simulator where you can review potential keyword bids to project what type of performance changes various bid changes would make.
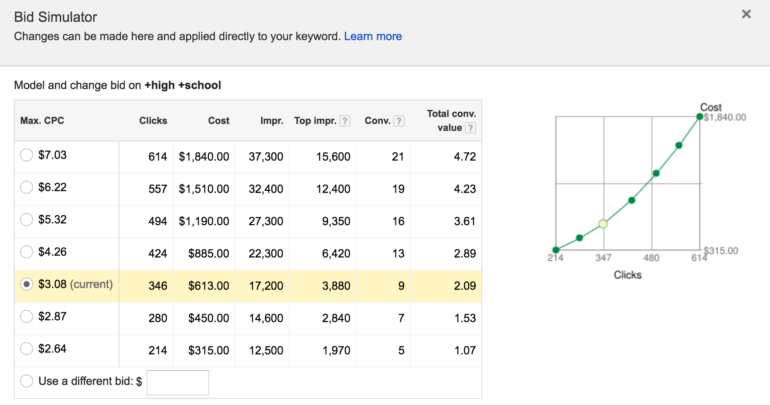
The simulator is meant to help guide your bidding by projecting volume and efficiency as you raise your bid. While this is a great tool to get some estimates, Google’s algorithm is fairly unknown and at times is inaccurate.
Something that advertisers have the tools to do is to create their own assessment with historical data if they’ve been adjusting keyword bids over time. Here is how to do just that!
First, you’ll want to pull raw data into a sheet with week by week data, campaign, ad group, keyword, and match type data. In terms of stats, simply pulling in clicks, impressions, cost, and conversions works for lead gen clients (you’ll want to add revenue for ecommerce clients).
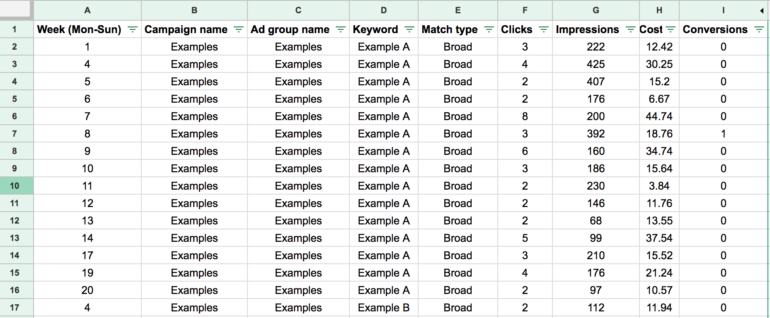
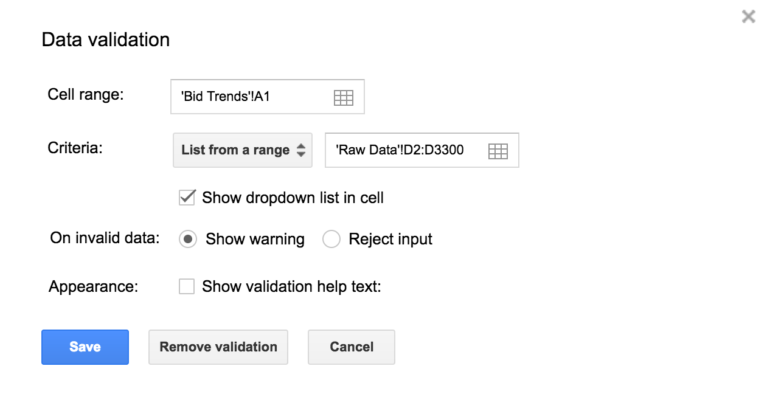
At Hanapin, we use Supermetrics in order to pull all of this data into Google Sheets automatically for us to run reports from, such as the one we are reviewing today. From the raw data within Google Sheets you can create a data validation field from your keywords by going to “data > data validation” and then filling out the data validation column as seen here.
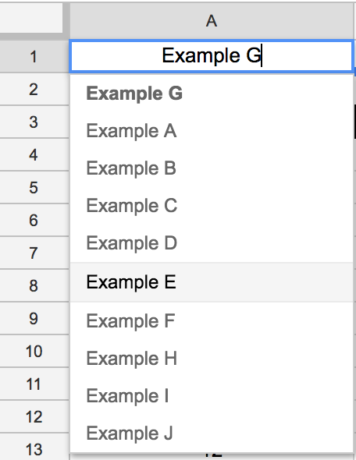
Once this is in place you should see a list of your keywords in the drop down list in the first cell of the bid trends sheet you created as seen here.
Once you have the drop down in place, we want to get the trends of the keywords performance in terms of the max CPC for each week and the statistics that followed that max CPC (clicks, impressions, cost, conversions). You pull this type of information by listing out the weeks and using SUMIF formulas. You can either manually list out weeks or use a “uniques” formula as seen here: =unique(Raw Data!A:A) – and this will pull from column A in the raw data sheet (the column with the weeks listed out) all of the unique values.
From there you begin writing your SUMIFs in order to get data by the week for the keyword selected in the data validation dropdown list. For example, to pull the CPCs:

You can see that in the first half of the formula we’re summing $H:$H (cost) if the week column aligns with $A4 and the keyword aligns wit $A$1 (the dropdown), and the backend of the formula does the same with clicks so that we can capture the CPC. You’d do the same for impressions, clicks, cost, and conversions as well (except only needing the first half of the formula). From there you’d be able to drag down and the formula will change based on the weekly performance for the keyword selected.
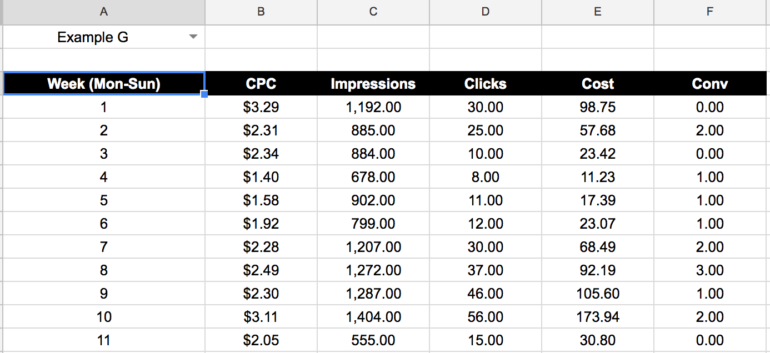
As you can see on the keyword: “Example G” the bids were adjusted quite frequently, and actually landed between $0.82 and $6.48 (more weeks than just 11 included). From here we can take the data given to us on a week by week basis and average this data out in certain bid ranges.

For example, here we are summing impressions when the CPCs are under $2 and over $1 and then dividing that bya number off weeks that occurred in order to get a weekly average when the bid lands between $1 and $2. Over $5 only happened once so we can take that extra data with a grain of salt) What we see is if we bid on Example G between $1 and $2 we project to receive 542 impressions, 14 clicks, and $25.11 in spend per week. We can see the lift we could receive in these stats as we raise the bid.
Conversion data is a tricky one that you can look at in different ways. You can either take the conversion data the same way you take in all of the other data and sometimes this breaks out when conversions come in by chance more when you had a bid set at a certain level (especially when the conversion data is lower). You can also project conversion rates to always stay constant which is what we did in this case.

Final Thoughts
Once you have this all laid out, it is as simple as scrolling through the drop-down list of keywords and visualizing what different bid ranges might do to your traffic and overall performance. Adding different graphs from this data can also be helpful for those who like visuals or if this is something you’d want to show a client in terms of bid ranges and performance alignment.