With 500 million active monthly users, Instagram offers a unique opportunity for marketers to reach their target audiences through ad campaigns.
The other perk of advertising on Instagram? The ads can look almost no different than regular posts, making them much less invasive than other ad types.
But setting up ads on any platform requires a lot of thought: What should your target audience look like? What should your copy say? What image should you use? There are a number of ads tools available that can help you create your ads and targeted audiences, but there’s still the more technical aspects to consider like what size your image needs to be or how long your ad should run for.
To simplify the process, we’ve put together a checklist to help you set up a campaign, one step at a time.
How to Create Instagram Ads: A Step-by-Step Guide to Advertising on Instagram
If you’ve ever set up a Facebook ad, you’re about 75% of the way there. After Facebook acquired Instagram back in 2012, the platforms conveniently merged, making setting up Instagram and Facebook ads merely the difference of a couple clicks. So even though your intent is to run ads on Instagram, all of the ad setup, budgeting, scheduling, and creation is done through Facebook’s platform.
How to Advertise on Instagram
- Select an editor and create your campaign.
- Determine an objective.
- Choose your audience.
- Set your placement.
- Make your budget and schedule.
- Curate your ad creative.
- Build your page & links.
- Report on the performance.
To start, log into your company’s Facebook portal and select the account you wish to use. (Note: To run ads on Instagram you’ll need to use a Facebook Page. Pages are specifically for businesses, brands, and organizations, while regular Facebook accounts are for personal use.)
1. Select an editor and create your campaign.
You can create Instagram ads using a few different tools:
When choosing which tool to use, you’ll want to consider both your company size and the number of ads you plan to run at once. If you’re managing a large number of campaigns, or you’re looking for really precise control over your campaigns, you might want to lean towards the Power Editor. However, the Ad Manager suits most marketers’ needs, so that’s what we’ll use for the sake of this article. (For more on the Facebook Ads API option, check out this page.)
Once you’ve selected an editor, you’ll see an option to either view all campaigns, or create a new one. To get started with an Instagram ad, you’ll want to create a new campaign.
2. Determine an objective.
You’ll notice that there are several different campaign objective options to choose from here. However, in order for your ad to be eligible to appear on Instagram, you’ll have to choose from a slightly shorter list:
- Boost your posts
- Send people to your website
- Increase conversions on your website
- Get installs of your app
- Increase engagement in your app
- Get video views
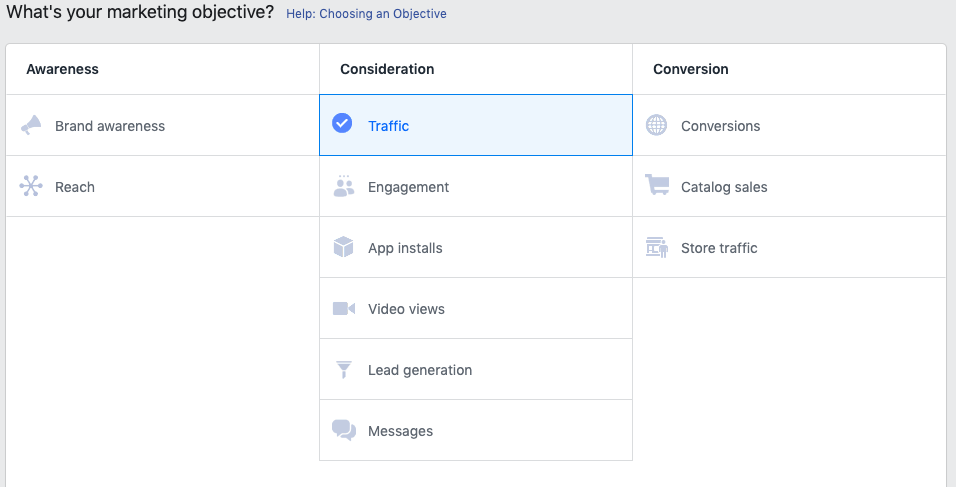 For this article, we’re going to select: “Traffic.”
When you select this option, you’ll be prompted to name your campaign. This may seem like a simple task (and it is) but it’s a good idea to have some sort of naming convention or set process within your company. This will make it easier for you to keep campaigns straight as you continue to create them.
Here at HubSpot, we like to name them in this format:
Company Department | Content/Offer/Asset Being Advertised | Date | Name of Creator
3. Choose your audience.
If you’re just starting out with Instagram advertising, odds are you won’t know exactly which audience you want to go after. This will come with time, and you may just have to play around with it at first. (If you want tips to help you choose the right audience, check out this page.)
During this step, you’ll find that the platform’s built-in targeting can be as simple or as extensive as you need it to be, with options such as:
- Location
- Age
- Gender
- Language
- Relationship
- Education
- Work
- Financial Status
- Home
- Ethnic Affinity
- Generation
- Parents
- Politics (U.S. only)
- Life Events
- Interests
- Behaviors
- Connections
You can create what’s called a custom audience to reach people who’ve already interacted with your business, or a lookalike audience to reach new people on Facebook who are similar to your most valuable audiences.
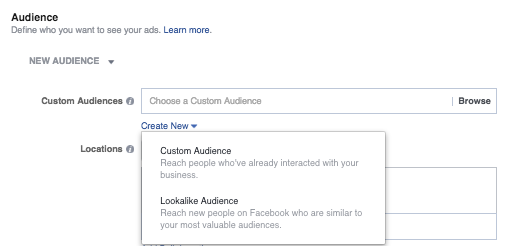
The ads platform also allows you to save the audience you create to be used again at a later time, which can be good if you’re experimenting and want to remember the exact audience you used for certain campaigns.
In terms of the objective we selected — “send people to your website” — we’ll want to target a more specific group of people: the type of people who are actually going to be interested in the content we present.
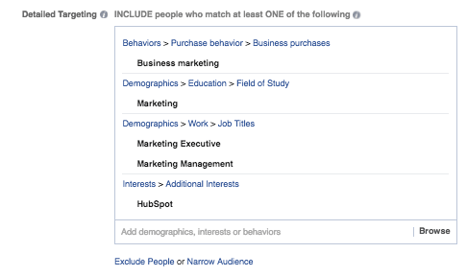
To do this, you’d jump down to the “Detailed Targeting” section, and search for different demographics, interests, or behaviors that apply to your target audience. Here’s an example of a (very small) audience, just to show you the different ways you can target certain people:
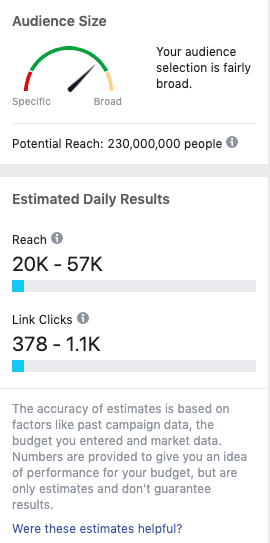
To give you a sense of the audience you’ve chosen, Facebook provides an “audience definition gauge.” This gives you immediate feedback on how narrow or broad your audience is, as well as the estimated reach number of your ad. Since we didn’t add very much criteria to our targeting, you’ll notice that the audience appears “fairly broad.”
4. Set your placement.
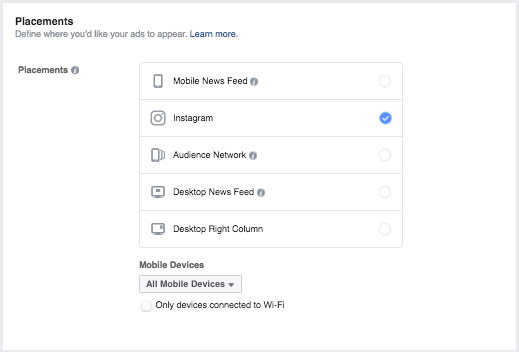
This step is the biggest differentiator between setting up Facebook ads vs. Instagram ads. To move forward with the Instagram ad, you’ll want to uncheck all the boxes except for “Instagram.”
5. Make your budget and schedule.
You have the option to select either a daily budget or a lifetime budget for your campaign. The difference is this:
- Daily budget sets your ad up to run continuously throughout the day, meaning that the algorithm will automatically pace your spending per day. Keep in mind that there is a minimum daily budget depending on different factors in your campaign, usually around $1.00.
- Lifetime budget sets your ad up to run for a specified length of time, meaning the ads algorithm paces your spending over that entire time period.
The other aspect to setting your budget is setting your schedule. You’ll need to choose exactly when you want your campaign to start and finish running, down to the minute. There are also options to set parameters so that your ad runs only during certain hours of the day or during specific days of the week. You can find these options in the “Ad Scheduling” section.
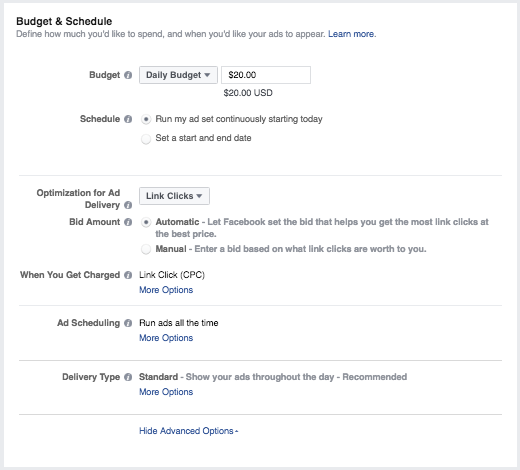
Then, you can set your ad up for delivery. Here, you have three options that will influence who sees your ads.
- Link Clicks: Your ads will be delivered accordingly to get the most clicks to your website at the lowest cost. This is all based on the platform’s algorithm.
- Impressions: Your ads will be delivered to people as many times as possible. Ever see the same ad on your newsfeed all day long? That company is most likely using this option.
- Daily Unique Reach: Your ad will be delivered to people up to once a day. People may see your ad multiple times, but at least not multiple times a day.
Then, after you choose your delivery method, you will have to figure out your bid amount.
This determines how effectively your ad is delivered. When you look “behind the scenes,” you’re competing with other advertisers trying to reach a similar audience in a constant auction.
You can choose either Manual or Automatic. Automatic leaves it up to Facebook’s algorithm to deliver your ad — ideally getting you the most clicks for the lowest cost. Manual allows you to set a price for link clicks. If a link click is worth a lot to you, try setting a higher than suggested bid, and your ad will be displayed over a competitor with a lower bid.
You can choose to pay based on impressions or link clicks. This is up to you.
After that, you can schedule your ads. Here are the options you have for delivery:
- Standard: shows your ads throughout the day.
- Accelerated: helps you reach an audience quickly for time-sensitive ads.
(Note: the accelerated delivery option requires manual bid pricing.)
Finally, you’ll have to name your ad set so you can identify it in Ads Manager later.
6. Curate your ad creative.
This is where your creativity comes in. Here you’ll decide what you want your ad to look like, which will depend on your original objective, of course.
(Psst — Want to get a stunning Story auto-magically created for your brand? Check out StoriesAds.com, a free Instagram Story generator from HubSpot and Shakr. Click here to get started.)
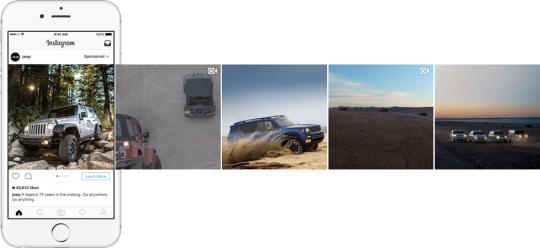
On Instagram, you have a couple different options for your ad:
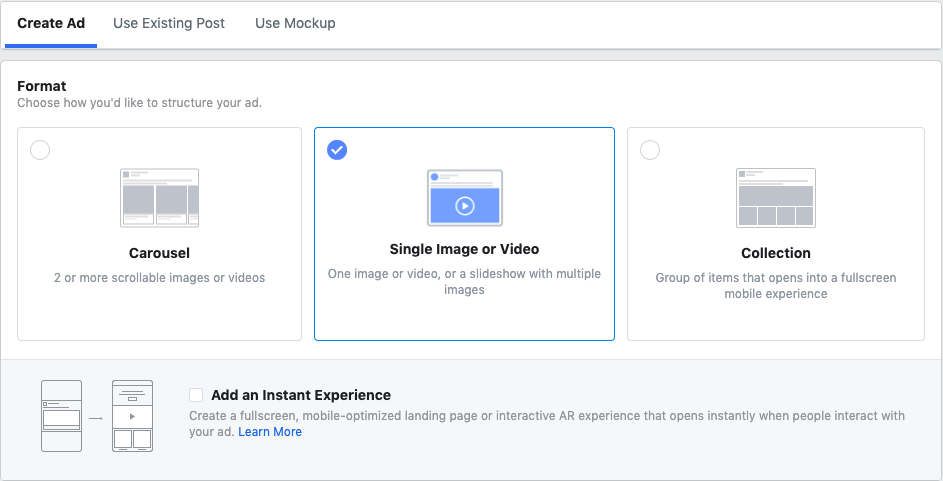
Single image or video, carousel, or collection.

Source
Up to five images or videos for the viewer to scroll through, at no extra cost.
Source
We actually ran some tests to see which type of ad performed the best for different purposes. Check out the results in here.
Once you pick your ad type, click on it and you’ll be prompted to browse and upload your imagery, whether that be images or a video.
For any ad type, the Facebook ads platform recommends you don’t include more than 20% of text. Previously, an ad with over 20% of text wouldn’t even be approved to run, but it has recently changed to more of a suggestion than anything. Learn more about the rules and guidelines here.
Some requirements for Instagram ad imagery:
File Type
Text/Caption
- Recommended: 125 characters
- Maximum: 2,200 characters
Square Image or Video ad
- Recommended Image Size: 1080 x 1080 pixels
- Minimum Resolution Accepted: 600 x 600 pixels
- Image Aspect Ratio: 1:1
Landscape Image or Video ad
- Recommended Image Size: 1200 x 628 pixels
- Minimum Resolution Accepted: 600 x 600 pixels
- Image Aspect Ratio: 1:1
7. Build your page & links.
The next step is to build your page and set up links. Select the Facebook Page of the account you want your ads to come from, even if you’re not planning on running them on Facebook. (If you’ve made it this far in the Ads Manager, you are already logged into a Facebook account.)
However, since our intent is to post ads on Instagram, you’ll need to connect your Instagram account to your Facebook ad account. To do so, click “Add Account” (you’ll need your Instagram username and password to do so).
If your business doesn’t have an Instagram account, you can still run ads on Instagram — they’ll just come from your business’ Facebook Page instead. In other words, your Facebook Page name and profile picture will be used to represent your business within your ad as it runs on Instagram.
Next is a very important step: putting in the website URL to which you’re trying to drive more traffic. If you’re using marketing automation software, be sure to create a unique tracking URL with UTM parameters for this to ensure that you’ll be able to keep track of traffic and conversions from this ad.
(HubSpot customers: Learn more about creating a tracking URL here.)
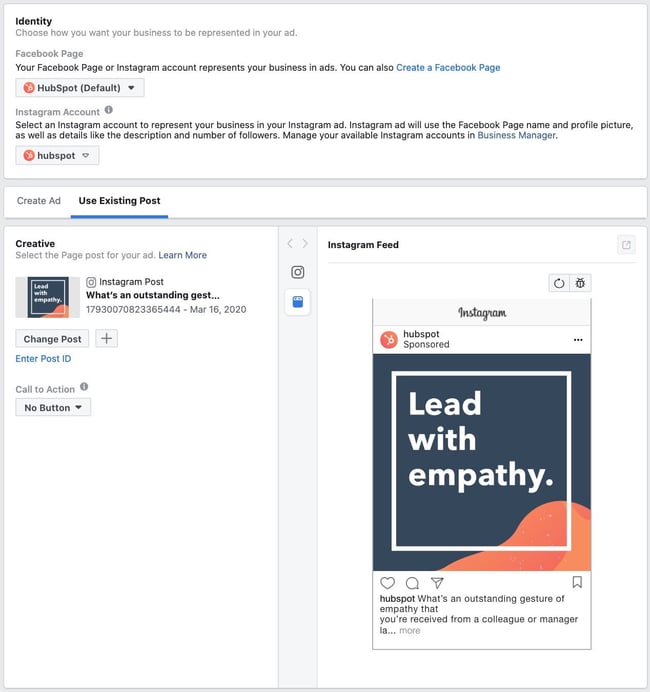
Next, you’ll add a headline. This is not usually displayed to viewers of your ad on Instagram, but it’s always a good idea to complete it just in case. Enter a brief headline describing where people will visit.
After making a headline, you’ll add a caption.
You have up to 2,200 characters — but you don’t have to use all of them. Facebook recommends you keep your text under 125 characters, which is the amount that’s displayed without needing to click “more.”
Select a Call-to-Action.
There are several different options for your CTA button, depending on what the page you’re taking visitors to looks like. You can choose to have no button, or select any of the following:
- Learn More
- Apply Now
- Book Now
- Contact Us
- Download
- Hope Now
- Sign Up
- Watch More
For our sake, we’ll stick with “Learn More,” as we’re just driving people to our website.
Once your image is uploaded and your text is set, check out the preview of your ad to make sure everything looks right.
At this point, you’ll have the option to edit the “Advanced Options,” but only if you wish. Advanced Options include adding tags, changing your display link, entering URL parameters, setting up sponsors, and opting in or out of pixel tracking.
Then, you’re ready to place the ad! Click the green button to confirm, and your ad will be presented to the world.
8. Report on the performance.
Once your ads are up and running on Instagram, it’s important to keep an eye on how they’re doing. You can go back in and tweak most aspects of the ad, so if you catch a mistake you made or your image isn’t doing as well as you’d like it to, you can go in and alter these things.
You can look at results of your ads in two places:
- The Facebook Ads Manager
- Your marketing software
In the Ads Manager:
There’s a sophisticated and extensive dashboard that provides users with an overview of all their campaigns. Without customizing any settings, you’ll find data on reach, cost per result, and amount spent.
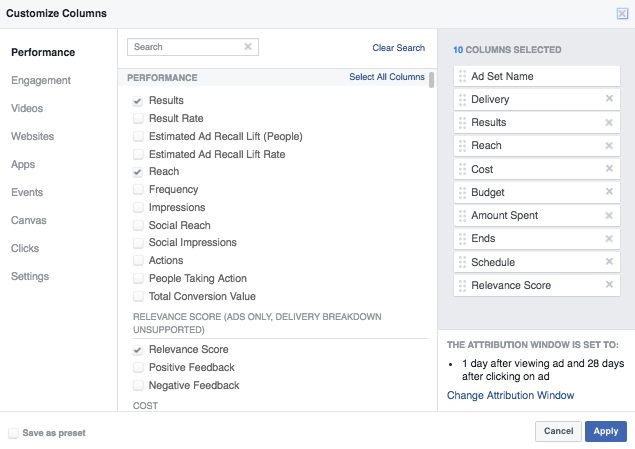
In the upper right-hand corner, you’ll see a button that says “Columns: Performance.” If you click the drop down menu, there’s an option to customize columns, which allows you to choose the specific data you want to see. There’s data ranging from CPC or CTR, to things much more specific like “Adds to Cart” for ecommerce stores.
Here are the categories that the available metrics fall into:
- Performance (reach, results, frequency, etc.)
- Engagement (post likes, post comments, post shares, etc.)
- Videos (video views, average percent of video viewed, etc.)
- Website (checkouts, payment details, adds to cart, etc.)
- Apps (installs, engagement, cost per app engagement, etc.)
- Events (event responses, cost per event response, etc.)
- Clicks (unique clicks, social clicks, CTR, CPC)
- Settings (start date, end date, ad set name, delivery, bit, ad ID, and objective)
With your marketing software:
With so many metrics to track, it can be easy to lose sight of the big picture. To truly track your success, take advantage of your marketing software and the UTM codes you used in your ads to measure your ads’ full-funnel effectiveness.
Looking at the specific tracking codes through your marketing software will help you keep track of how many leads (or better yet, customers) you actually generated through your Instagram advertising campaign. This ROI information can then be used to inform other campaigns down the line.
If you’re a HubSpot customer, you can create unique tracking codes for your Instagram campaign by following the instructions here. All you’ll need to do is plug in the URL, attach a campaign, and choose the source you want the URL to be attributed to in your Sources Report.
Once your ad launches and you start getting traffic and conversions to your website, you’ll be able to easily track how many visits, contacts, and customers you’re generating.
Have you seen success with Instagram ads? Let us know in the comments section below.
