Images impact the load time of a website. The faster the site, the better the user experience, leading to conversions and profits.
Business managers and owners want their site’s images to load fast, even on mobile devices. But how do they do it? In “The Case for Optimizing Image Performance,” my article last week, I explained the importance of lightweight images on a site’s success.
In this piece, I’ll offer suggestions for optimizing images. The goal is to create an attractive user experience without bogging down performance.
Eliminate Unnecessary Images
In 2019, a typical web page may request between 28 and 32 images when it loads, according to a report from the HTTP Archive. Those images may be necessary.
For example, one would expect numerous images to appear on a product category page of an ecommerce website. These pictures are usually critical.
Writing for UX Planet, a user experience journal on Medium, Ainsley Fagerström described the sorts of images that should be on a website. Paraphrasing and adding to her list, we could say necessary images:
- Explain or clarify,
- Evoke emotions to communicate something,
- Make a point related to the other content,
- Help you sell.
The sorts of images that may be eliminated could include:
- Pictures of text,
- Decorative images,
- Stock images that don’t communicate something.
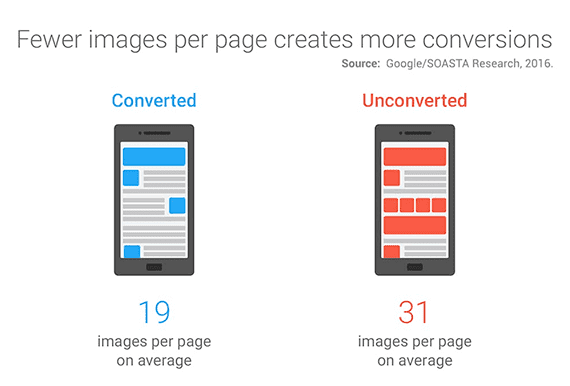
There is also data that indicates having fewer images on a web page leads to more sales.
“On a typical retail page, graphic elements such as favicons, logos, and product images can easily comprise up to two-thirds (in other words, hundreds of kilobytes) of a page’s total weight,” wrote Daniel An and Pat Meenan in a 2016 Think with Google article. “The result: cumulatively slow page loads throughout a session. In fact, … sessions that converted users had 38 percent fewer images than sessions that didn’t convert.”

A report from 2016 indicates that relatively complex and slow pages (which often include lots of images) convert at a lower rate than faster pages with fewer images.
Lazy Load Images
When a typical web page loads, it requests every image listed in the page markup, even when many of those images are off screen and will only appear when or if the user swipes and scrolls down the page.
Lazy loading of images is the process of loading an image only when it is needed. When a web page first loads, it requests only those images that will be immediately visible on the screen. Subsequent images load when the user moves down.
The HTTP Archive reported that a mobile web page’s median kilobytes of image data transferred could drop from 843.5 KB to 426.7 KB when lazy loading off-screen images. This might reduce the initial page load time by 25 percent in some cases.
A variation of lazy-loading images injects a low-resolution version of an image initially and then updates it with a high-quality version after a user can see it. This approach also significantly reduces how long it takes a page to load.
Lazy loading typically requires JavaScript. A business could have its developers write a lazy-loading script tailored to the company’s needs or use any one of several available scripts.
In an article about shaving seconds from a site’s initial load time, contributor Hamlet Batista recommended Andrea Verlicchi’s LazyLoad script. Katie Hempenius, a software engineer at Google, recommends using Alexander Farkas’ Lazysizes script. Both of these solutions are examples of the many scripts for lazy loading.
Compress Images
Raster formats — such as .jpg, .png, .webp, and .gif — make up many of the images on a typical web page. In some cases, these images can be compressed to make them load more quickly without a noticeable difference in quality.

Compressed images can look nearly identical to much heavier uncompressed images. The image on the left is 169.5 KB. The image on the right is much smaller 39.5 KB but is similar in quality. Photo: Robert Bye.
One can compress images manually using software such as Adobe Photoshop, ImageOptim, or Squoosh, to a name a few options. Or one could optimize automatically via a number of solutions, including content delivery networks, application programming interfaces, and scripts or packages.

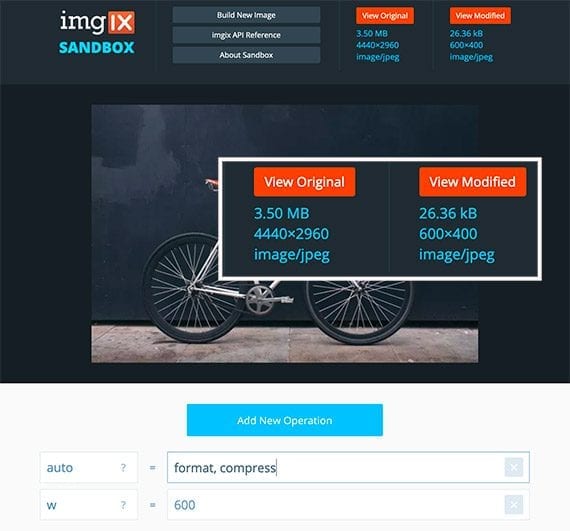
This example from Imgix, an image-optimization CDN, shows an original 3.5 MB photo reduced to 26.36 KB.
In an article about image optimization, the Google Developers site recommended several solutions.
Image optimization CDNs:
Image optimization APIs:
Imagine optimization scripts, packages, and command line tools:
Load the Proper Size
Deliver the proper size image for a user’s screen. Wasted pixels add unnecessary weight.
In his excellent article about image optimization, developer Ilya Grigorik points out that uncompressed raster images are made up of pixels and that weigh 4 bytes each on the initial load.
Thus, a 100 x 100 pixel uncompressed raster image is 40,000 bytes (10,000 x 4). To convert bytes to kilobytes, divide by 1,024. So 40,000 bytes works out to be about 39 KB.
Imagine that you have an image that will be displayed on the screen at 360 x 200 pixels. At this size, the uncompressed raster image would be 72,000 pixels. Each of these pixels requires 4 bytes, for a total of 288,000 bytes or about 281 KB uncompressed.
An oversized image at, say, 396 x 220 pixels would be much heavier. Specifically, the 396 x 220 image would occupy 87,120 pixels. That is 15,120 extra pixels (87,120 – 72,000). Those wasted pixels still require 4 bytes each for a total of 60,480 bytes or 59 KB.
This example is for uncompressed raster images. And there are many ways to compress the image’s size in bytes without impacting its pixel resolution. Regardless, serve the proper size image whenever possible.