Okay team, it’s almost 2020 and that means knowing how to schedule Instagram posts in advance is no longer ‘neat,’ it’s non-negotiable.
Whether you’re running a business account, a creator account, or you’re building up your brand on the regular, using an Instagram scheduler is one of the best ways to reclaim your time and creativity.
In this post we’ll take you through the steps and best practices for all three types of Instagram accounts, so you can turn your attention to what matters.
Table of contents
5 benefits of scheduling Instagram posts
How to schedule Instagram posts (business account)
How to schedule Instagram posts (personal account)
How to schedule Instagram posts (creator accounts)
What’s the difference between Instagram scheduling and Instagram automation?
Best practices for scheduling Instagram posts
5 benefits of scheduling Instagram posts
1. Save your valuable time
Your calendar is already crammed. Instead of dropping everything to craft your next post—every single day, at the exact right time for your audience—an Instagram scheduler lets you plan ahead.
Block off a few fresh hours at the start of the week to line up your visuals and write some crisp copy. Then load it all into your social media calendar and relax, knowing it will hit your timeline right when your followers want it.
2. Perfect your aesthetic
On Instagram—more than any other social media platform—brands live and die by their look. Whether you’re a beachy influencer or a bleeding-edge tech startup, the colour, composition and tone of your posts should feel genuine, and recognizably unique.
Of course, that’s easier said than done.
Assembling multiple posts in one batch makes it easier to stay on brand. And seeing what’s coming up in your planner helps to catch weird vibes or off-brand looks before they go public and hurt your engagement.
3. Stop switching back and forth between screens
Call me an Old Millennial, but sometimes working on a computer is just easier. Especially when the videographer transferred the teaser videos in a .zip and the celebrity partner only approved two of those twenty-four pretty-much-identical photos from the shoot.
An Instagram scheduler allows you to drag and drop your visual assets straight from your desktop to your calendar. Catch those typos on the big screen.
4. Get more followers
Every time you post to Instagram you’re increasing your brand’s visibility. Both to existing followers and new ones. Maybe your post will hit it big and make Instagram’s Explore Page. At the very least, people will find you via the hashtags you select.
Scheduling your posts in advance is a simple hack for your Instagram hashtag strategy. While using the same thirty mostly-irrelevant hashtags on every post will win you no points with the algorithm, with a scheduler you can fine-tune your tactics in advance.
5. Increase your engagement
Don’t ghost your followers. Give the people what they want.
One of the simplest, best ways to get more Instagram likes is to post when your followers are online. Of course, if your analytics are telling you that your followers are in Hanoi or Cape Town, their morning commute might not be the most convenient time to be on Instagram for you (or your work/life balance).
It looks like the self-help gurus were right: to make it stick, schedule it in.
So let’s take a look at how, exactly, Instagram scheduling works. Of course, because we’re biased, we’re going to show you how using Hootsuite’s Instagram scheduler.
How to schedule Instagram posts if you have a business account
If you’re a retailer, local business, brand, organization, or service provider, you probably already have a business account on Instagram. (And if you do, please smugly sip your coffee and skip to Step 2.) If you don’t, take a look at Step 1.
Step 1: Convert your Instagram account to a business profile
There are plenty of advantages to converting to a business account. You get access to Instagram’s advanced native analytics to learn more about your followers, you can promote posts as ads, and add links to your Stories.
But most importantly: this is the only type of Instagram account that has the ability to directly publish and schedule Instagram posts using Hootsuite.
To convert your account, open the Instagram app on your phone.
- Tap the hamburger icon
- Tap the settings button
- Tap Account
- Tap Switch to Professional Account
- Select Business and follow the prompts
Note that you’ll need to connect your Instagram account to your Facebook business Page to do this.
Pro tip: be aware that the type of business label you select on your Facebook page is visible on your Instagram profile.
Step 2: Add your Instagram business profile to your social media management platform
If you’re using Hootsuite, it’s quite simple to link your Instagram account.
- Click your profile icon in the top right corner
- Click Manage Social Networks
- Click + Private Network in the bottom-left corner of the dashboard to add Instagram
- Or, if f you’re part of a larger team: click Manage beside your organization name and click Add a Social Network or Add a Shared Network to add this profile to an organization
- Click on Instagram in the list, and then click Connect with Instagram
- Input your account credentials
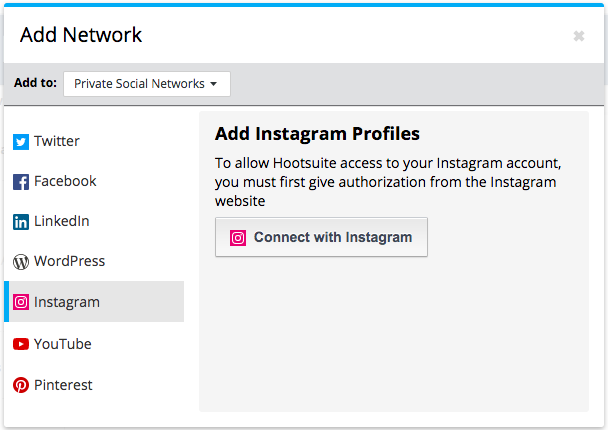
Note that in order to enable direct publishing, you’ll also need to add your account’s associated Facebook Page to Hootsuite, as well.
For all the details on getting yourself set up, read our help article.
Step 3: Compose your post(s)
Now comes the fun part.
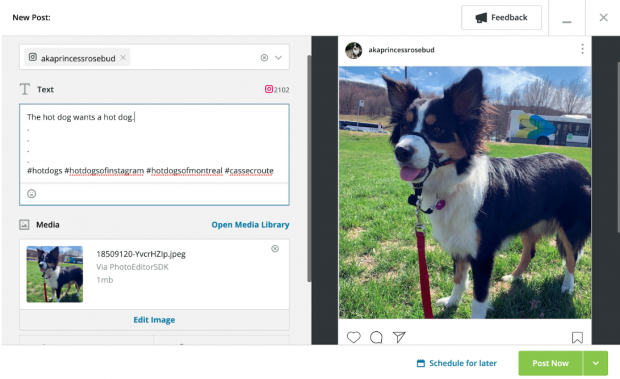
- Click New Post and select Instagram from the list
- Upload your photo or video (you can also crop, filter and otherwise edit it in Hootsuite)
- Write your compelling Instagram caption
- Add your hashtags, @s, and location
- Preview your post in the right hand pane
Step 4: Schedule your post
When you click Schedule for Later (as opposed to Post Now), you can choose the time and date your post will go live.
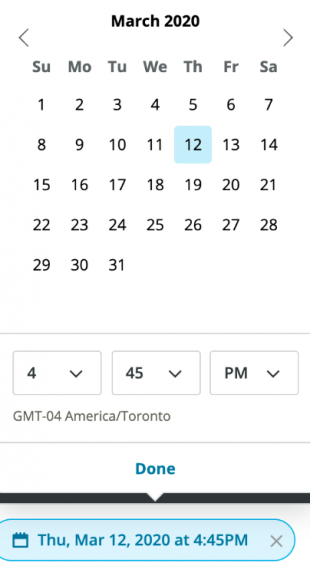
The Hootsuite scheduler automatically suggests the optimal time, but you can get to know your audience’s habits using your Instagram analytics.
Pro tip: Definitely take a look at our comprehensive industry-by-industry breakdown of the best times to post to Instagram.
Step 5: Wait for your post to be published to Instagram
That’s it! Welcome to the ease of Instagram scheduling.
How to schedule Instagram posts if you have a personal account
Not everyone has or needs a business account on Instagram. If your Instagram presence is more about connecting with your audience, rather than hard metrics like conversions and click-throughs, you might have good reason to bypass the business account vibe and stick with a regular account.
(And Instagram has now introduced a third option: the creator account, which we’ll cover in the next section.)
Instagram’s API doesn’t allow personal accounts to schedule posts to be published directly, so instead we’ll show you how to set up a mobile notification workflow.
Basically, this means you set up your post(s), and then schedule a reminder via push notification. When the time comes to post, you get an alert on your phone that reminds you to click through and hit ‘publish.’
Pro tip: While this method works with newsfeed posts and videos, you can also follow these steps to schedule an Instagram Story, or a carousel post.
Ok, so let’s walk through the process.
Step 1: Add your Instagram profile to your social media management platform
We have (conveniently) chosen Hootsuite as our go-to social media management platform for Instagram scheduling.
So, from your Hootsuite dashboard:
- Click your profile icon in the top right corner
- Click Manage Social Networks
- Click + Private Network in the bottom-left corner of the dashboard to add Instagram for personal use
- Click on Instagram in the list, and then click Connect with Instagram
- Input your account credentials.
One other thing: when scheduling posts for personal accounts, it’s crucial that you have notifications turned on in the Hootsuite mobile app.
If you don’t, you’ll receive an error message. (And if you ignore the error message, your posts won’t get published.)

Step 2: Write and edit your post
Now that you’ve got your workflow set up, it’s time to line up your posts.
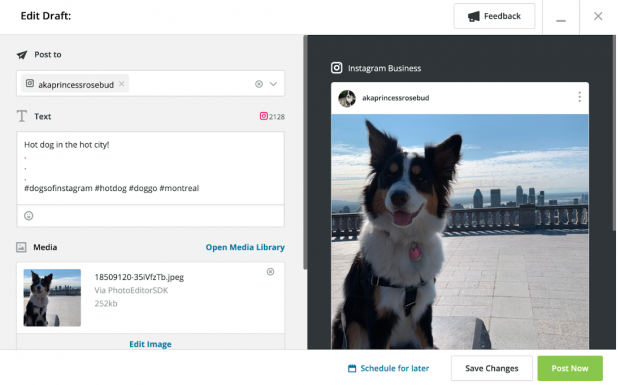
- Click New Post and select your Instagram account from the list
- Upload your visuals (you can also crop, filter and edit them using Hootsuite’s photo editor)
- Compose your very excellent Instagram caption
- Add your relevant hashtags, tag relevant accounts, and add your location
Step 3: Schedule your post
Click Schedule for Later and select the date you want the post to go live, as well as the best time for your audience.
Step 4: Publish your post
When the time comes, you’ll receive a push notification from the Hootsuite app. Follow the prompts, check the details one last time, and hit post.
How to schedule Instagram posts for creator accounts
Are you a public figure, content producer, artist, or influencer? Instagram recently introduced this new type of account to help users who are trying to manage their large followings more effectively.
Creator accounts have specific tools designed for influencers (e.g., a tiered inbox and reply shortcuts) as well as more granular analytics to help dig deeper into what’s working and what’s not in your day-to-day strategy.
For more details, here’s everything you need to know about Instagram creator accounts.
When it comes to scheduling for creator accounts, the Instagram API doesn’t support scheduling from third-party platforms. Only business accounts have that privilege.
However, as a creator, you can schedule from within the Facebook Creator Studio. Here’s how.
Step 1: Switch to a creator account
Whether you’re currently a business account or not, switching to a creator account is simple.
In the Instagram app on your phone:
- Tap the hamburger icon
- Tap the settings button
- Tap Account
- Tap Switch to Professional Account
- Select Creator and follow the prompts
You can choose your display label (eg., chef, author, fashion model, etc.). Note that while it’s technically optional to link your creator account to a Facebook page, you can’t use Creator Studio without doing so.
Step 2: Connect your Instagram account to Creator Studio
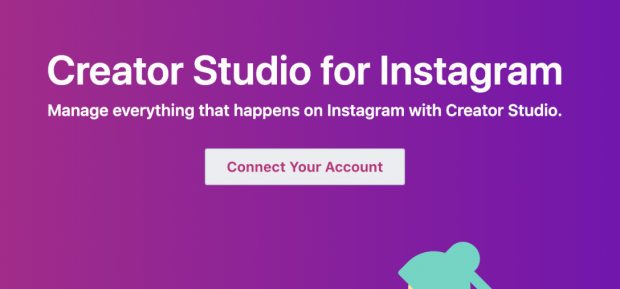
Now head over to Instagram Creator Studio and input your login information.
Step 3: Create your post
Click the Create Post button in the top left corner of the dashboard.
Then select where you want to post: on your Instagram feed, or IGTV. (Here is our explainer on how to schedule IGTV.)
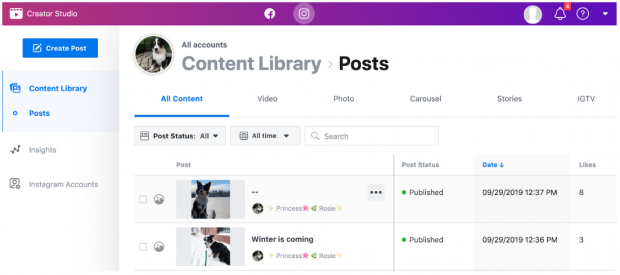
Next, upload your photo, video, or carousel; write your caption; and add your hashtags. You can also add a location.
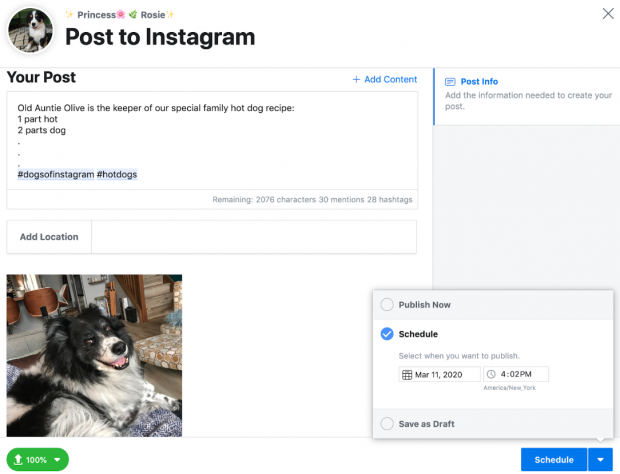
Step 3: Schedule your post
When you press Schedule in the bottom right corner, you can choose the date and time you want your post to appear.
Pro tip: If you don’t already know the best time for your audience, now is the time to consult our research, and your own Instagram analytics.
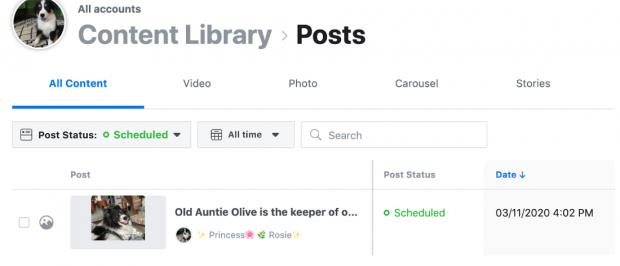
You can review your upcoming posts in the dashboard, and make any necessary edits.
Step 4: Wait for your post to go live
What’s the difference between Instagram scheduling and Instagram automation?
Instagram scheduling is when you craft your posts in advance. Instagram automation is paying to have bots like or comment on random strangers’ posts in order to improve your account’s follower ratio and engagement.
It… doesn’t really work very well. In fact, it can be actively harmful to your brand’s relationships.
And given Instagram’s ongoing crackdown on bots, spam and scams, spending budget on shady activities is probably about as effective as, you know, buying a verified badge from some guy in your DMs. (Hint: please don’t.)
On the other hand, there are plenty of legitimate tools that use automation to help you get off the hamster wheel of repetition. Check out our list of white-hat social media automation tools for inspiration.
Best practices for scheduling Instagram posts
Don’t sacrifice quality for quantity
Yes, the miracle of Instagram scheduling means you can now post every 30 minutes. (All respect to @fashionnova). But should you?
The short answer is “maybe.” The long answer is “maybe, if you can maintain consistent quality at that pace over the long term. But great engagement rates have more to do with consistency than frequency.”
Remember that the Instagram algorithm prizes relationships: if your followers are engaging with your content, the algorithm will show more of it to them.
Upload and organize your visuals in Hootsuite’s content library
How do you organize your social media content? Dropbox, Google Drive? Lot of folders titled ‘misc social’ on your desktop? Your personal smartphone’s photo app?
This is better: there are tags, permissions, and a truck-load of metadata to help you find what you need, when you need it.
And while I can’t personally guarantee that you’ll never have to send an 11 p.m. email to a photographer you’ve never met asking her to re-send touched-up files from a 2017 shoot, I do promise that this is a great first step.
Don’t schedule too far in advance
Hootsuite power users often tell us they block out their schedule by activity, whether it’s a shoot day for visual assets or Tuesday morning’s croissant-and-writing binge.
We’re all for efficiency (see previous point) but when it comes to social media scheduling, going much farther than a week in advance can start to increase the risk of something going sideways. (There is always a risk there’ll be another royal baby announcement drowning out your product launch.)
Our advice: keep your finger on the pulse, and stay nimble.
Write once, edit twice (or thrice)
Especially for big teams with a lot of moving parts, an internal multi-stage approval system is ideal for preventing a gaffe, or a full-blown crisis.
And even if you’re a solopreneur, do make sure you take a fresh look at that copy before it goes live.
Use analytics wisely
The best part about scheduling Instagram posts is that it frees up your time to take a look at the big picture. What’s earning you likes? What’s falling flat? Maybe you could even run some A/B tests, get mathy about it. Choose your preferred Instagram analytics tool and get cracking.
Use Hootsuite to easily create and schedule Instagram posts, engage the audience, track competitors, and measure performance—all from the same dashboard that manage all your other social media channels on. Try it free today.
Get Started
