We’re pretty big on measurement on this blog, and we use analytics to identify key topics, improve our content, and prove our effectiveness.
To this end, we’re big users of Google Analytics.
We use a bunch of custom reports, segments and dashboards for measurement but also the trusty Google URL builder (take our Advanced Data & Analytics training course to learn more).
So, for the uninitiated, here’s a quick run through of how to use it, and a few suggested applications…
What is campaign tracking?
Campaign tracking allows you to add tracking code to a URL so that visits coming through said link can be tracked.
For example, if you arrived at the blog post by clicking through from Econsultancy’s Twitter feed, the end of the URL should look like this:
?utm_source=twitter&utm_medium=social&utm_campaign=econ%20blog
This is the work of our social media manager, and is intended to help them to track the sharing of blog links on social media.
This doesn’t have any affect on how the page displays, and it can also be shortened, using bit.ly for example, and the tracking will remain.
This can be applied in a number of ways: to track referrals from a particular social source, an email campaign, online ads and more.
All that’s required is to add the tracking code to the URL and learn how to measure it when the time comes. This is where the URL builder comes in.
The Google URL builder
Here’s how to use the URL builder…
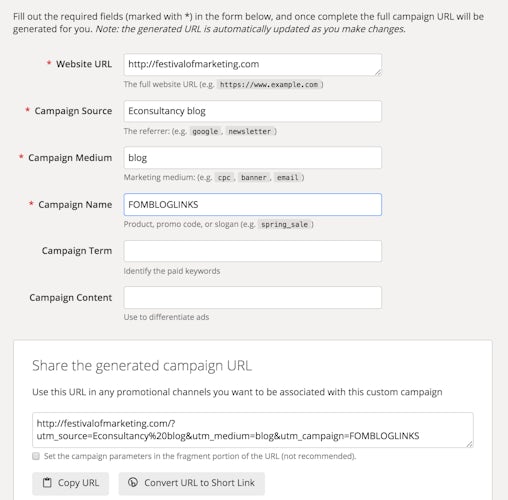
1. Enter the link you want to track
For example, we’ve used this to track referrals from this blog to our Festival of Marketing website. (Btw, it’s a great event and you should definitely buy a ticket for the next one).
This is so we can identify which placements within articles work best, which posts generate traffic, where to link to on the site, and so on.

2. Add the parameters you want to track
There are five fields, but three of them are compulsory. These are:
- Campaign source. In this case the blog, but this could be an email or a Facebook post for example.
- Medium. Again, we’ve added blog here, but this could be email, PPC and so on.
- Campaign name. This is the text that will show up in Google Analytics, so choose something that will be easily identifiable, distinct from other campaigns, and not too long.
3. Submit the form and grab the code
This will generate the URL with the tracking code appended. Then just copy and paste into the email, tweet or blog link of your choice.
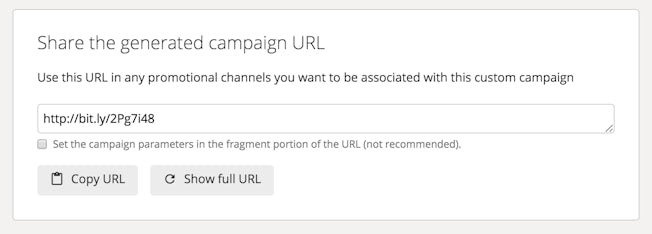
4. Shorten the URL
As you can see in the screenshot above, the URL with tracking is quite cumbersome, so you may find it easier to shorten it before using. Google URL builder has a bit.ly integration, which allows you to shorten your URL right away.

How to view campaigns in Google Analytics
The next step, after you’ve given your campaign time to generate some traffic, is to view the results in Google Analytics.
To do this, log on to Google Analytics, open the acquisition menu on the left and select campaigns:
![]()
You should then see your selected campaign name on the list, if you have had any clicks that is.
In this case, we set up two different codes, one which sends people to the Festival site’s homepage, another to the speaker lineup. This way we can tell which one works best in terms of traffic and conversions.

It was early days when we took these screenshots, so we just had a handful of clicks, but with more time and data you will learn a more about how the campaign has performed, and whether you need to make any changes.
Most importantly we can see whether campaigns are converting, but metrics on bounce rates and session duration will also give an idea of whether we’re sending the right kind of traffic.
Why marketers should have roots in tech: Sarah Kennedy, CMO of Marketo
