- By
Considering using LifterLMS to create your own online course with WordPress?
LifterLMS has established itself as one of the premier WordPress LMS plugins, so it’s definitely a good one to have on your shortlist. But is it the right plugin for your needs? That’s what I’m going to help you discover in this post.
From a “features” perspective, LifterLMS is an excellent plugin. But, depending on your specific needs, it can sometimes end up being a little expensive, which might make another plugin a better option if you’re on a budget.
At the same time, it also offers one of the most generous free versions of any LMS plugin, so it can also work out to be more affordable than similar plugins, which is an odd dynamic. It really just depends on the specific features that you need and how you plan to use it.
To help you make your decision, I’ll cover:
- LifterLMS key features
- How LifterLMS works, with a hands-on look at the interface
- The various premium add-ons and how much they’ll cost you
- The best themes to pair with LifterLMS
- Some real-world examples of sites that use LifterLMS
Let’s dig in…
LifterLMS Review of the Features
In a nutshell, LifterLMS helps you create and deliver online courses, complete with lessons, assignments, and quizzes (if you so desire).
LifterLMS comes in a free core plugin at WordPress.org that includes the bulk of the course management functionality.
With the free core version, you can use a drag-and-drop editor to design and structure your courses, complete with unlimited lessons, along with the option to add quizzes and assignments to lessons.
You can also restrict access to your courses so that people need to register to access them. For further control, you can also set up course prerequisites. For example, you could make students take an introductory course before they’re eligible to take the advanced course.
You’re also able to:
- Set up custom emails based on user activity, like completing a course or failing a quiz.
- Give users achievements or downloadable certificates for certain actions, like completing a course.
- Drip out course content to keep students coming back, like offering a new lesson every week of a student’s membership.
To add more functionality to your courses and/or sell paid access, you can use an array of premium extensions to add features like:
- Payments, either with direct payment gateways or a WooCommerce integration
- Email marketing integrations
- More advanced quizzes and assignments
- Social learning
- Private coaching (which lets you upsell this as an extra service)
- Group/organization access to course content
As I take you through a hands-on look at LifterLMS, you’ll see how these features come together.
How to Create a Course With LifterLMS (Hands-On)
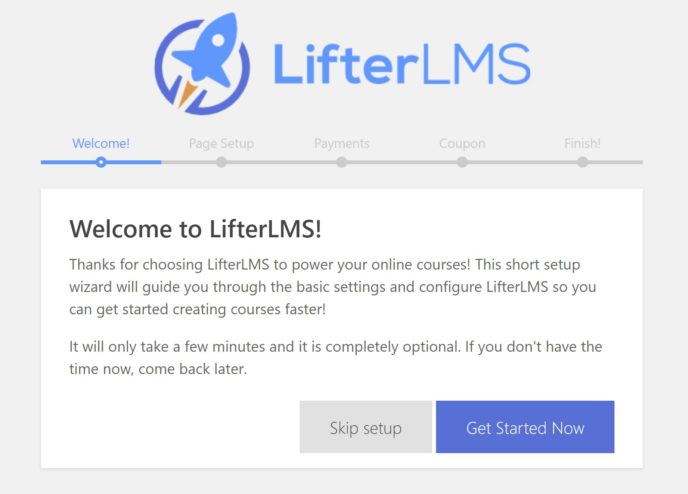
When you first install and activate the LifterLMS plugin from WordPress.org, it’ll launch you into a setup wizard that helps you configure important basics for your course like:
- Creating the core pages for key functionality, like your course catalog and student dashboard
- Setting up default payment currencies (if offering paid courses)
You can also get a coupon for the premium extensions if you opt into non-sensitive tracking, though this is totally optional. Keep this in mind if you decide to buy some premium extensions, though, as it can save you some money.
Once you finish the setup wizard, you can either:
- Build your first course from scratch.
- Install a sample course. The sample course actually teaches you how to use LifterLMS, so this is a neat way to both teach you how to use the product and show you how everything connects in the WordPress dashboard.
Creating a Course
To create a course from scratch, you go to Courses → Add Course.
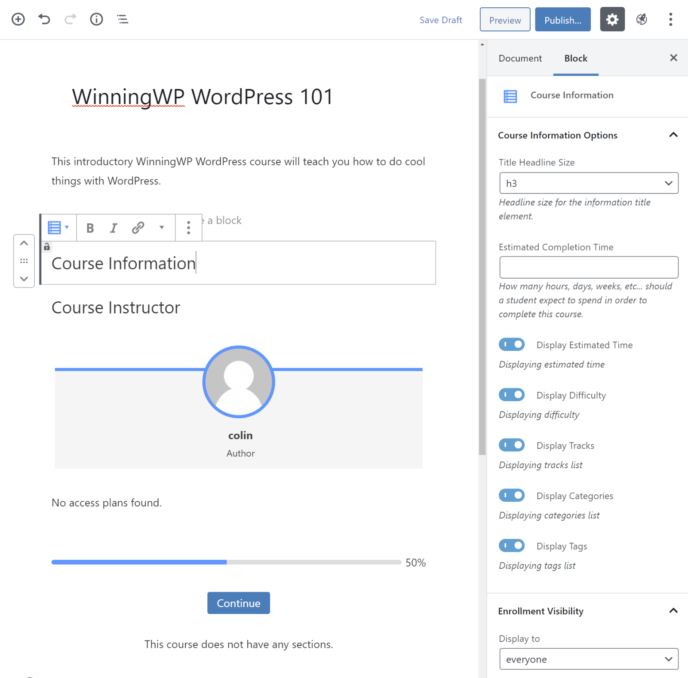
LifterLMS uses the native WordPress editor for most functionality, which makes it easy to get started because you’re using the same familiar interface that you use for everything else.
To manage the main course information page, you’ll get dedicated blocks. You can also use regular blocks to add content, like a course description or images.
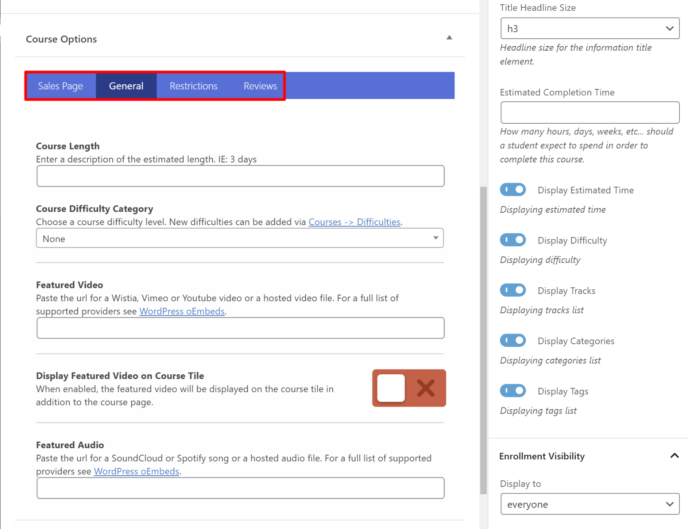
You’ll also get a new Course Options meta box underneath the WordPress editor where you can manage additional course information like:
- Course length
- Course difficulty
- Featured introduction video
- Restrictions, like whether students can only enroll between certain dates, whether they need to take prerequisite courses, or whether there’s a maximum capacity for the course
- Whether to enable and/or display customer reviews
Below that, you can set up Access Plans. These are what let you control access to your course, including requiring people to pay for access (though you’ll need a paid add-on to process payments).
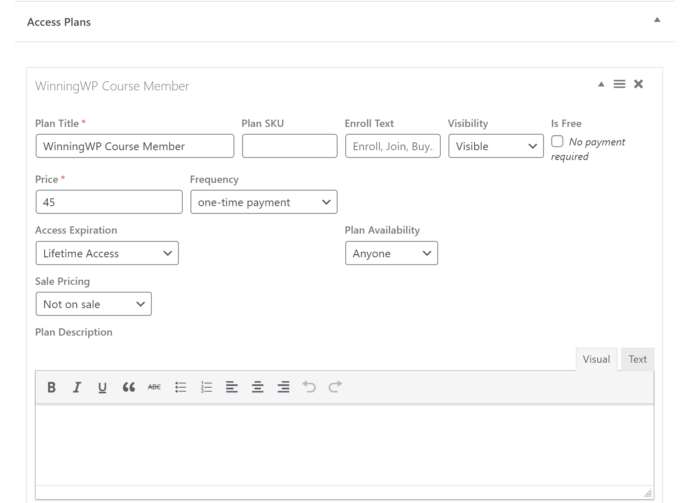
You can set up:
- A price (or you can make it free)
- Whether the payment is one-time or recurring
- Whether the payment gets people lifetime access or if the plan expires on a certain date or after a certain amount of time.
- Who can purchase the course
Using the Drag-and-Drop Course Builder
Once you set up the basic course details, you can add the course content in the form of:
- Sections – specific categories of lessons. E.g. one section of a course might contain five lessons.
- Lessons – the actual course content that students will consume.
To help you organize everything, LifterLMS gives you a drag-and-drop course builder interface, which is quite convenient.
To add a new section or lesson, all you do is drag it over. Then, you can click and type to edit it:
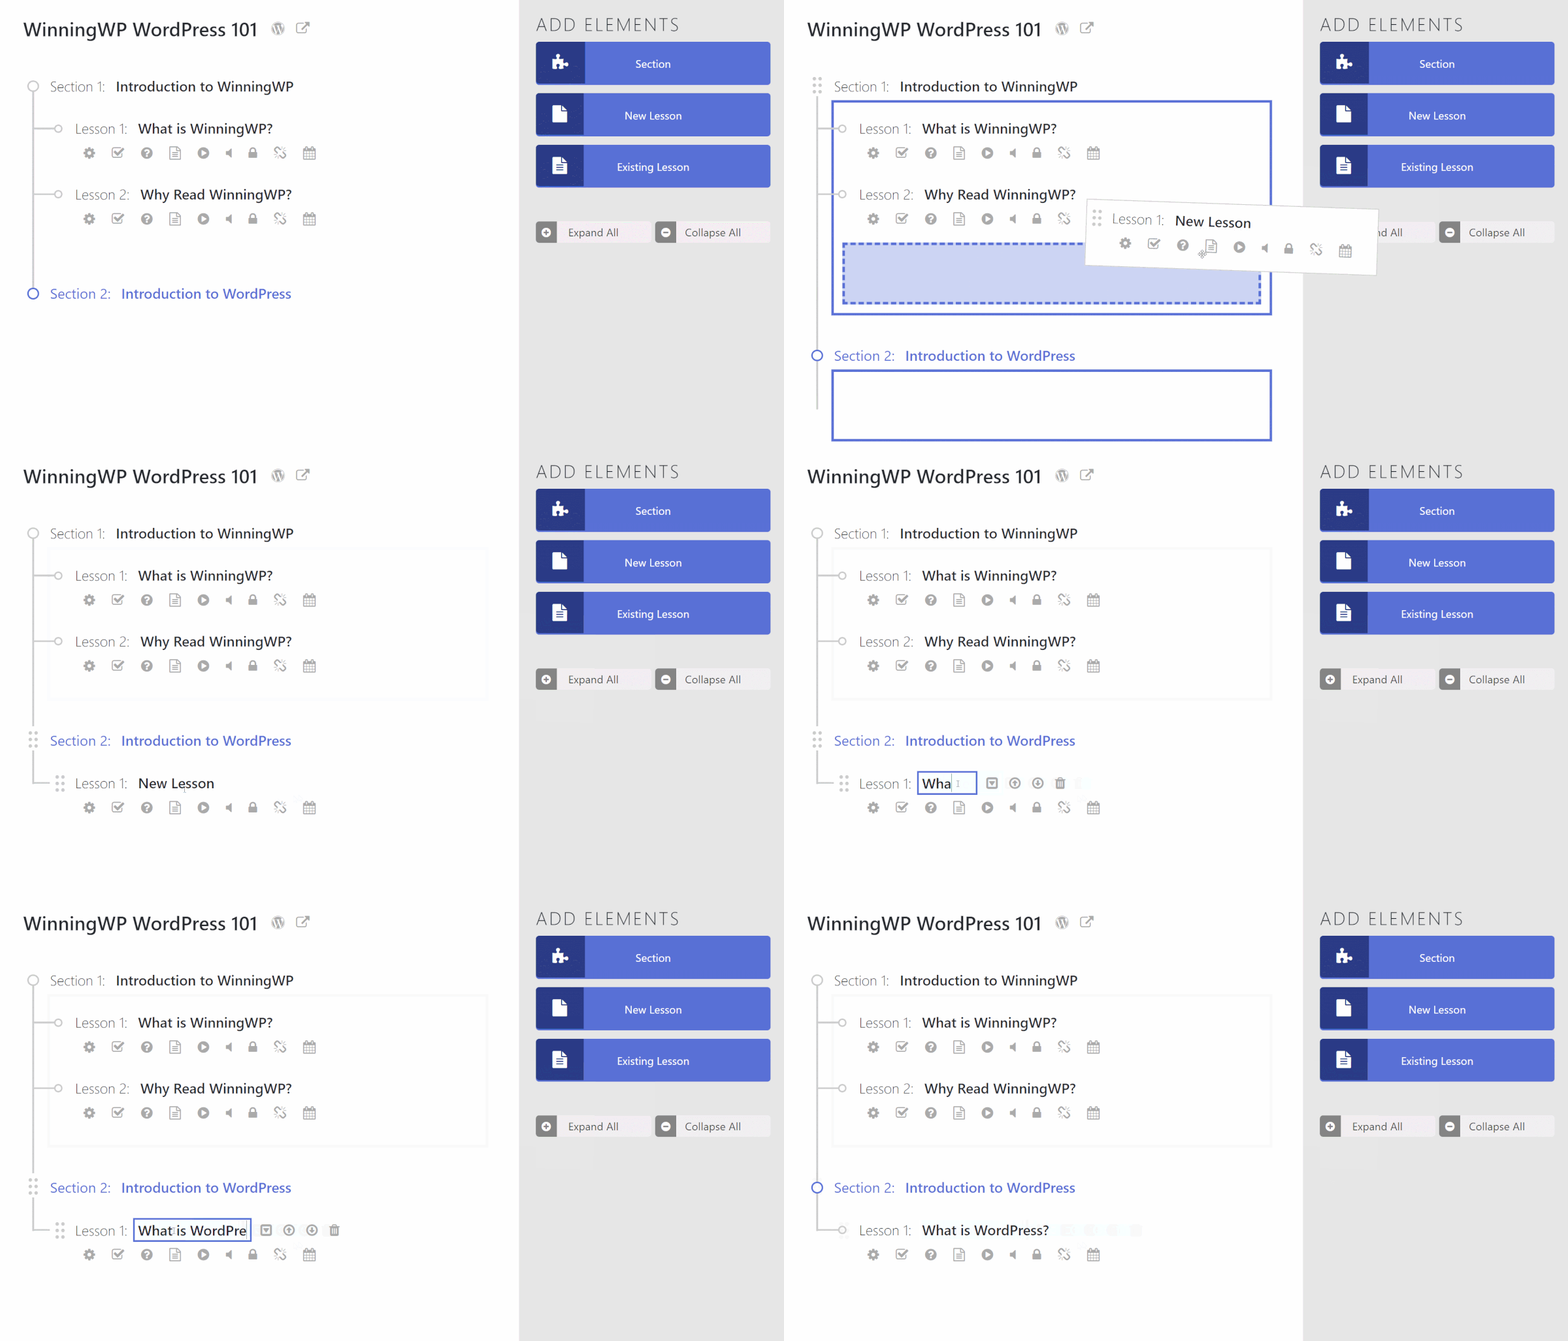
From there, you can use the icons underneath or beside each lesson or section to add content or edit its functionality.
If you decide you want to change the order of your sections/lessons, all you need to do is drag things around until they’re perfect.
Adding Lesson Content
To open a lesson’s settings, you can click the arrow to open the WordPress editor for that lesson in a separate tab.
In the WordPress editor, you’ll again be able to add lesson content using the familiar WordPress editor, which makes it easy to control content and layout:
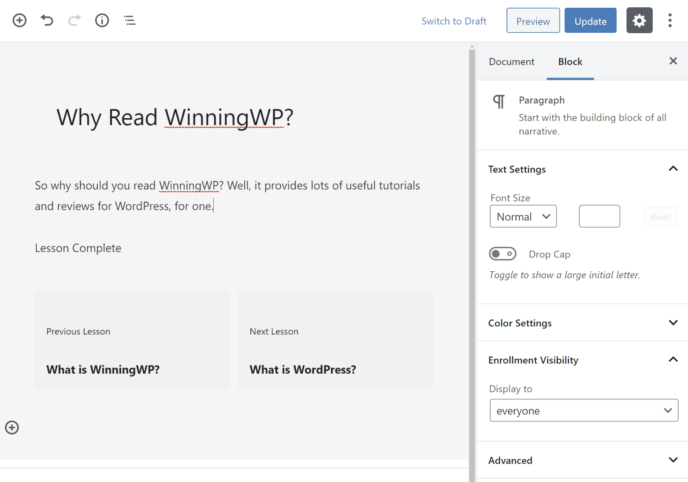
Below that, you’ll get a Lesson Settings meta box where you can:
- Embed a video or audio file for that lesson
- Mark the lesson as “free”, which lets visitors preview it without signing up for the course. Think of this like a “free trial” to entice people to sign up for the rest of the course.
- Set up prerequisite lessons that students must complete before they can take this lesson.
- Set up content dripping so that the lesson isn’t available right away. For example, you could have students get access to one lesson every week to stop them from binging and keep them coming back.
- Require students to get a passing score on a quiz before they can pass the lesson and advance to the next lesson.
Adding Quizzes or Assignments
To add quizzes or assignments to lessons, you can use the icons in the drag-and-drop course builder.
This will open a slide-out panel where you can edit the details. For example, here’s what it looks like to add a quiz:
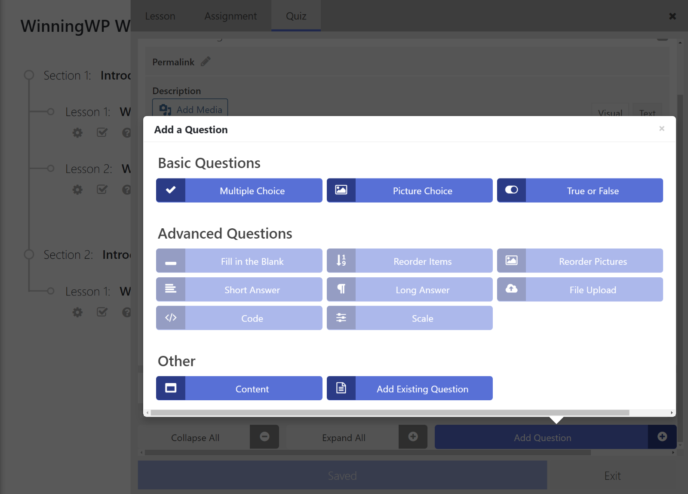
With the free version, you only get access to the three basic question types. You’ll need a premium add-on to unlock the additional quiz types.
Thoughts on Creating a Course With LifterLMS
While I didn’t show you everything, the sections above cover the core process of creating a course with LifterLMS.
Overall, I find the editor to be quite convenient. The clear “tree hierarchy” and drag-and-drop makes it easy to organize your course content, which could otherwise feel overwhelming.
Additionally, LifterLMS has done a good job of trying to keep as many options as possible within the same interface, which helps to cut down on unnecessary page reloads and speed up course creation.
Other Notable Features
At this point, I hope you have a pretty good idea of what it’s like to build a course with LifterLMS. Now, let’s run through some of the other notable features that LifterLMS gives you access to.
Create Memberships to Give Access to Multiple Courses
With the access plan feature that I showed you above, you can control access to a single course. But LifterLMS also lets you offer/sell memberships that give people access to multiple courses.
You could create a membership that gets people access to every single course that you offer or use memberships to offer limited course bundles.
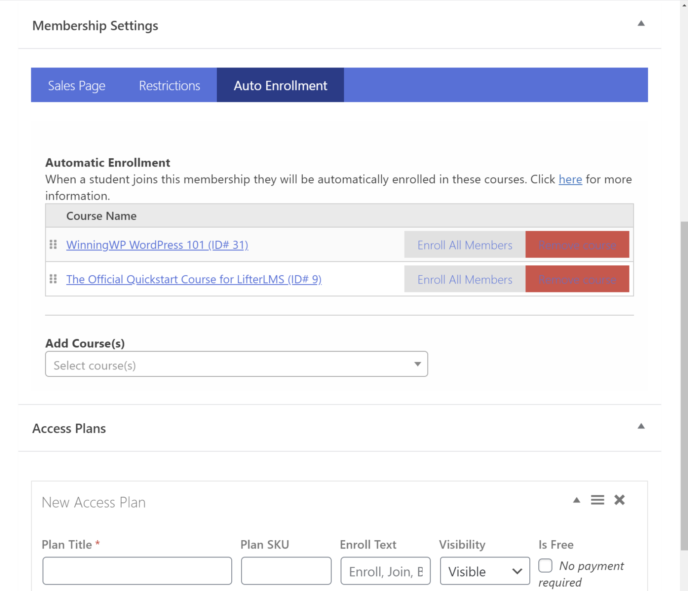
You can set these up from the Memberships area in your WordPress dashboard. In addition to creating an access plan for each membership (just like you did for a course), you can also choose which courses to automatically add new members to when they purchase a membership:
Set Up Automation With Engagements
Engagements are a powerful feature that let you trigger actions based on a user’s activity, like when a student:
- Enrolls in a course
- Completes a lesson or a course
- Passes or fails a quiz
- Etc.
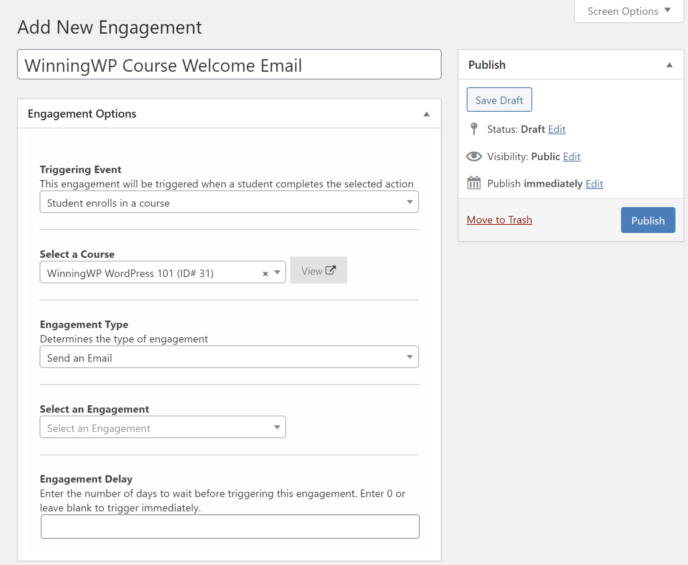
The main use of this feature is to trigger automatic emails based on these actions. For example, you could send a student a welcome email when they enroll in a course, or send them a congratulations email when they finish:
In addition to sending emails, you can also award:
- Achievements – small actions, like completing their first lesson.
- Certificates – larger actions, like completing a course or a group of courses. Kind of like a diploma. With a paid extension, you can also offer certificates as a PDF.
Detailed Reporting Dashboard
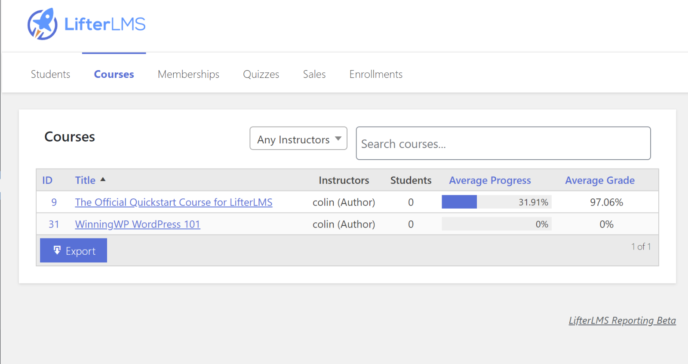
To help you analyze your site’s effectiveness, LifterLMS includes dedicated reporting dashboards to help you analyze:
- Students
- Courses
- Memberships
- Quizzes
- Sales
- Enrollments
This helps you discover who/what is performing well, as well as the opposite:
Exploring the Paid LifterLMS Add-Ons
The core LifterLMS plugin is available for free at WordPress.org, but most course owners will probably also need some of the paid add-ons.
For example, if you want to offer paid courses, you’ll need to purchase at least one of the payment gateway add-ons (or the WooCommerce integration).
Let’s go through the various add-ons that are available…
Payment Add-ons
LifterLMS offers three dedicated payment gateway integrations, as well as a WooCommerce integration that lets you link courses to WooCommerce products.
The three dedicated payment gateways are:
New Course Features
You’ll also find a number of add-ons that add new features to your courses:
- Advanced Quizzes – get access to more quiz question types and other advanced features.
- Assignments – create different types of assignments that visitors must complete.
- Advanced Videos – while the free version lets you create video course content, this extension adds new features, like forcing people to watch a video before they can complete the lesson.
New Membership and Community Features
Beyond new course features, other add-ons can help you create a more social community or offer group access to your courses:
- Social Learning – let students connect with one another with social media style conversations.
- Private Areas – give each student a private area where you can offer personalized content.
- Groups – sell group memberships or course access. For example, you could sell institutional access to a business so that the business can give all of their employees access to your course content.
Email Marketing and Form Integrations
You can find add-ons to integrate with popular email marketing services and WordPress form plugins.
Email marketing services:
WordPress form plugins:
A number of third-party plugins also offer their own LifterLMS integration plugins.
Other Add-ons
Here are some other premium LifterLMS add-ons that don’t fit neatly into any category:
- Custom Fields – add custom fields to collect and display additional information from students.
- PDFs – turn important features, like certificates, into PDFs.
- Twilio Integration – send text (SMS) messages via Twilio.
LifterLMS Add-On Pricing
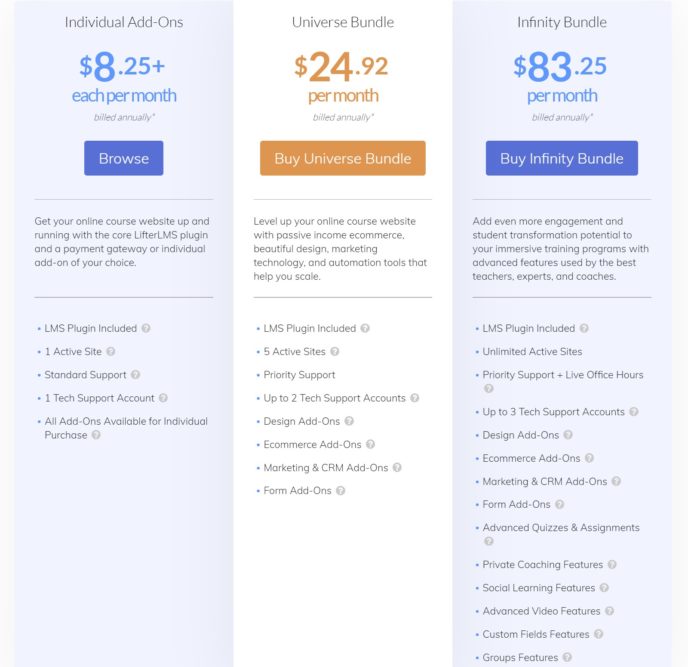
To get access to the premium add-ons, you can either purchase individual add-ons for $99 each or you can get bundles of add-ons for $300 or $1,000 respectively.
I think there are two scenarios for how to approach the paid add-ons.
First, if the free core plugin does everything that you need course wise, you might be able to get away with purchasing a single payment gateway for $99. This is the cheapest way to create a paid online course with LifterLMS, and it’s a viable approach for many websites.
If you need more than just a payment gateway, though, you’d probably be better off purchasing the Universe Bundle for $300, or about the price of three individual extensions.
This gets you access to all of the add-ons that most courses need and usually offers better value than purchasing individual extensions, unless you’re absolutely sure that you only need one or two add-ons.
You only need to consider the pricey $1,000 Infinity Bundle if you want access to features like:
- Community learning, either with social learning or group memberships
- Private coaching upsells
- Advanced quizzes and video courses
Sometimes, it might make sense to purchase the Universe bundle and then just grab separate add-ons for the extra features that you need, like advanced quizzes.
I think the Infinity Bundle is more useful for academic or business courses (like corporate training programs), whereas most consumer-focused courses will probably be fine with the cheaper Universe Bundle or individual add-on purchases.
Best Themes to Pair With LifterLMS
LifterLMS works with almost* any WordPress theme, but choosing a theme with a built-in LifterLMS integration will make it easier to get started because you won’t need to mess around with styles or CSS as much.
*The one exception is themes that don’t include sidebars, like the default Twenty Twenty theme. These can cause some problems because LifterLMS needs a sidebar to include important course information. LifterLMS will warn you if it detects an issue with your theme.
LifterLMS offers its own LifterLMS LaunchPad theme that’s one good option. It costs $99 or is available as part of the $300 Universe bundle.
The popular Astra theme (our review) also offers a dedicated LifterLMS integration that makes it easy to control the design of your courses.
Some other good LifterLMS themes are:
Real-World Examples of Sites That Use LifterLMS
Now that you know all about the features, do you want to see what those features look like on a real online course website?
LifterLMS is quite popular, so you can find a lot of real-world examples of LifterLMS in action.
It’s also used by a lot of WordPress courses, which is a vote of confidence by itself that people who teach about WordPress use LifterLMS.
One popular example is WP101, which started using LifterLMS back in 2016.
WP101 (our review) has a collection of free and premium courses that teach you how to use WordPress and some key extensions. If you want to see it in action without paying, you can sign up for the free WordPress 101 course, which is obviously running on LifterLMS.
Both Divi Academy and Divi Space also use LifterLMS.
Outside the WordPress space, other real-world examples of LifterLMS include:
Final Thoughts on LifterLMS
LifterLMS is definitely one of the best WordPress LMS plugins. It includes a depth of functionality that most other LMS plugins just don’t offer, and it also nails the membership aspects of online courses, which not all plugins do well.
Functionality wise, I have no problem recommending this one, and the reviews at WordPress.org show that most people agree with me. It has a stellar 4.6-star rating (out of 5) at the time that I’m writing this LifterLMS review.
One thing to consider is the price. LifterLMS is in this weird kind of limbo where it can be both affordable and expensive at the same time, depending on your specific needs.
So how is it affordable? Well, because the free version at WordPress.org is so generous, most “normal” course makers will find everything they need in the free plugin.
That means all you’d need to do is purchase one of the payment gateway add-ons for $99 and you’re ready to start selling online courses, which is a great deal and cheaper than much of the competition.
However, if you find yourself in a situation where you need more than just a single payment gateway add-on, then LifterLMS can also get quite pricey. The cheapest add-on bundle is $300, with the most expensive bundle going for a whopping $1,000.
If you compare that to something like LearnDash at $159, LifterLMS no longer looks so cheap.
So here’s my recommendation:
Install the free version of LifterLMS from WordPress.org and see if it can do what you need it to. It includes a ton of features, so it probably can get the job done.
Then, all you need to do is purchase a payment gateway add-on and you’re set to jet.
On the other hand, if you’re on a budget and find yourself needing one of the bundles or multiple separate add-on purchases, you might want to check out something like LearnDash (our review) to see if it can get the job done for a lower price. You can also consider other LMS plugins.
If you want to try out the premium LifterLMS add-ons, you can also spin up a 30-day full-featured demo with all of the premium add-ons to test things out before spending $300+.
Used/using LifterLMS? Thoughts?


